Thursday, November 4, 2021

Sous Vide Short Rib "Pot Roast"

 1 October 2021

Recipe from Sous Vide for Everybody, America's Test Kitchen, 2018, p. 74; also available online.


I've been doing sous vide cooking since the start of the year, though it is a method I've known about and been interested in using for some time. Food is sealed in a plastic bag then cooked in a constant temperature water bath. It provides even cooking of the food with little to no risk of overcooking and, as a bonus, leads to easy clean up. I recently got a sous vide cook book and this recipe is one that stood out to me. This recipe is the only one I have made where the meat is cooked in a sauce.


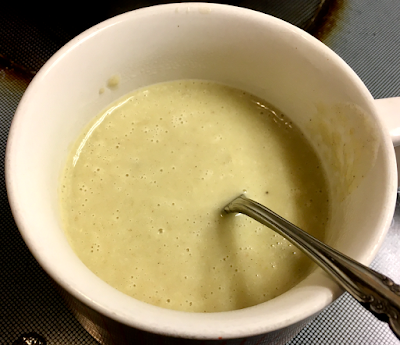
Beef short ribs were seasoned with salt and pepper, browned in a Dutch oven, then set aside. Onion, celery, carrot, salt, and pepper were added to the fat in the Dutch oven and cooked until softened. Tomato paste and garlic were added and cooked until fragrant. Red wine was added, the pot was deglazed, and the mixture cooked until reduced in volume. Beef broth was added, simmered for a few minutes, then processed until smooth in a blender. The ribs and broth were divided between two zipper bags, bay and thyme were added, and the food was cooked at 160° for 22½ hours. (This is much longer than most food cooked sous vide.) It was removed from the water bath, chilled in an ice bath, and refrigerated. Preparation took about an hour. For serving, the ribs were reheated, sous vide, at 160° for about 30 minutes. The ribs were removed and the cooking liquid was strained and cooked on the stove until reduced to about 2 cups.


This "pot roast" was very good and though a long time was spent cooking the meat it was done with no effort on my part once everything was prepared and set up. The meat was a little tough but that was a minor complaint. The sauce/gravy was excellent. I would make this again but I'd probably make half as much.

Tuesday, November 2, 2021

French Potato Pie

 25 September 2021

Recipe from Cook's Illustrated, March 2021


I was intrigued by this recipe when I found it in the CI magazine. We like potatoes and we like pie so why wouldn't a pie with an all-butter crust and a filling made with potatoes in a cream sauce be good? It's sort of a scalloped potato pie. There was one good way to find out if this is a dish to make regularly, or not, and that's to make one and eat it.


Salt and flour, combined in a food processor, were processed with cubed butter forming a smooth paste. Flour was added and the mixture pulsed forming small pieces of dough. This was transferred into a bowl and tossed with frozen grated butter. Ice water was sprinkled over the mixture and tossed to combine. The dough was divided into two equal portions, shaped into disks, wrapped in plastic, and chilled in the refrigerator. This process took 40 minutes.


Several hours before serving, the filling was prepared. Thinly sliced onion was salted and set aside. Sliced potatoes and baking soda were added to boiling water, cooked for 1 minute, drained, and returned to the Dutch oven. Cream, garlic, pepper, nutmeg, and the salted onion were combined and and simmered until the cream thickened. While the filling cooled, the pie dough was rolled out; one half was placed in a pie pan and the other on a backing sheet. These were placed in the refrigerator to chill. Chopped parsley was added to the potato mixture and spread in the pie plate. The top crust was added, the edges were trimmed and crimped with a fork. A round hole was cut from the center of the top crust which was then brushed with an egg wash. The pie was baked at 450° for about 20' then at 325° until the potatoes were tender. Total time to prepare was 7 hours, but much of this was hands off and the time could be shortened if needed.


We enjoyed eating this pie. My favorite part was the crust which was crispy, flaky, and buttery. Diane preferred the filling of tender creamy potatoes. We had the pie mostly has a warm side dish with ham where it was still good but the crust was no longer crisp. While this pie was very good it did seem like a lot of work for something we served primarily as a side dish.

Thursday, October 28, 2021

Free-Form Summer Fruit Tartlets for Two

 16 September 2021

Recipe from America's Test Kitchen


This recipe is from a recent edition of the ATK TV show. It uses some of my favorite summer fruits and looks to be quick and easy to make. Fortunately I decided to make it just before the end of the summer fruit season here. If it's a good recipe, I may have to wait until next summer to make it again.

Flour and salt were combined in a food processor. Small pieces of unsalted butter, frozen, were scattered over the flour mixture and processed until the mixture resembled coarse sand. Ice water was added in one tablespoon portions and processed until the dough holds together when pressed between fingers. The recipe said 2-3 tablespoons of water but I needed just 1. The dough was dumped onto a lightly floured surface and formed into a rough rectangle about 3" by 8". It was then massaged, a technique called fraisage, where it was smeared with the heel of the hand into flakes. These were reassembled into a rectangle and the process was repeated. The dough was divided in half and each half formed into a 3-inch disk. These were wrapped and refrigerated for an hour. It took about 25 minutes to make the dough to this point.


The dough was removed from the refrigerator and rolled into 7-inch circles between two sheets of parchment paper. These were returned to the refrigerator to chill for 15-30 minutes. I'm not very good at rolling dough into a nice circle, thus these will be "rustic" tartlets. Many of my pastry desserts turn out to be "rustic".

The filling was made from using wedges of tree-ripened peaches (any stone fruit could be used) and blackberries (raspberries or blueberries would also be good.) The fruit was gently tossed with some sugar, I didn't need much because the fruit was ripe. It was then mounded into the center of the dough circles leaving  a 1½-inch border. The border was pleated around the berries, pinching the layers of dough together. Finally, the dough was brushed with a little water and dusted with sugar. The tartlets were baked for about 45 minutes at 400°. Total time was three hours, but much of this was waiting for the dough to chill after being worked.


We liked these desserts and look forward to having them next summer. We shared each one so got four servings from the two tartlets. They kept well and were as good the second day as the first. They are easy to make and good to eat. The crust was flaky and buttery and the overall dessert was not too sweet. This is an easy pastry dessert to make and so good if you are new to working with pastry dough. The flour and sugar on the parchment burned during baking and was a little bitter, being a little neater would solve this.


Wednesday, September 8, 2021

St. Louis-Style Pizza

 31 August 2021

Recipe from February 2010 Cook's Country


I've made several different kinds of pizza and written about them in this blog—New York pizza, one-hour pizza, Chicago pan pizza, Chicago thin crust pizza, Detroit-style pizza, French Bread pizza, grilled pizza, cast iron pizza, and probably more—and enjoyed making and eating pretty much all of them. So when I learned there was a St. Louis-style pizza I knew that I would want to try it, too. 


This is a thin-crust pizza made with a dough that does not include yeast. After turning on the oven, a no-cook sauce was made by mixing together canned tomato sauce, tomato paste, chopped fresh basil, sugar, and dried oregano. Next, the dough was made by mixing together flour, cornstarch, sugar, baking powder, and salt. Water and olive oil were mixed together then stirred into the flour mixture. The dough was kneaded briefly until it came together. Half of the dough was rolled into a very thin 12" circle on parchment paper. The dough was topped with half of the sauce and a mixture of grated mozzarella cheese, Monterey Jack cheese, and a little liquid smoke. (The recipe specified shredded white American cheese but I couldn't find that. The St. Louis recipe used Provel cheese which is not widely available. So what I made is my version of the Test Kitchen's version of St. Louis pizza.) The pizza was baked for about 10 minutes on a pizza stone that had been heated in a 475° oven for about 10 minutes. The remaining dough, sauce, and cheese were refrigerated and used to make a second pizza after two days. Total time to prepare the pizza was just an hour.


The very thin crust was nice and crisp but with some chew so it was not as dry and crispy as a saltine cracker. The liquid smoke, just three drops, provided just a hint of smokiness but otherwise the toppings were not very distinctive. This pizza was probably the easiest and quickest to prepare of any pizza recipes that I've tried. We enjoyed it better the second time, giving it a few more minutes in the oven to crisp up the crust improved it. Nonetheless I don't expect to be making this again, I prefer the flavor of a good yeast-dough crust and miss it in this pizza.

Thursday, August 26, 2021

Banana-Walnut Muffins

 6 July 2021

Recipe from Cook's Illustrated, May 2021


I recently made corn muffins that, for several reasons, I preferred to corn bread. Not only did they taste good and have a good texture, but there were advantages in having single-serving sized portions ready to go. So when a recipe for banana-walnut muffins appeared I wondered if the same might be true, would these be a convenient form of banana bread?


The dry ingredients (bread flour, baking powder, baking soda, salt) were whisked together in a bowl. Six bananas were mashed then mixed with sugar, eggs, oil and vanilla extract. The flour mixture was added to the wet ingredients and whisked until combined. Chopped toasted walnuts were mixed in. The batter was portioned into twelve oiled muffin cups and the tops were sprinkled with sugar. These were baked at 425° until a toothpick inserted in the middle came out clean. Total time to prepare these muffins was just 50 minutes.


I may have used too much banana, I don't remember if I measured the mashed banana to see if there was 2 cups; since the bananas were not large I used 6 instead of the 4-5 large bananas listed in the recipe. The muffins were good but did not have as strong a banana flavor as my favorite banana bread. The sugar sprinkled on the tops almost overpowered the banana flavor. The muffins were good and very easy to make but they are not a replacement for my favorite banana bread.

Tuesday, August 24, 2021

Grilled Pork Tenderloin with Grilled Pineapple-Red Onion Salsa

 30 June 2021

Recipe from America's Test Kitchen


Our favorite pork tenderloin recipe is prepared in the oven featuring a maple glaze. I have written about this and many other recipes for this tender cut of meat and here is yet another. Our attraction to this cut may be in part because of its size. At one pound a whole pork tenderloin is just right for us for two meals and it is quick to cook.


I halved the published recipe which was for two tenderloins. Salt, sugar, cumin, and chile powder were combined and rubbed on the trimmed tenderloin. The recipe used chipotle chile powder, I substituted plain chile powder. The gas grill was preheated then two of the three burners were turned off. The tenderloin was placed on the hot side of the grill and cooked until all sides were well browned. The tenderloin was moved to the cool side of the grill and pineapple and red onion wedges that had been sprayed with vegetable oil were placed on the hot side, covered, and cooked until both sides were charred and softened.  The pork was cooked to 140°.  The tenderloins were tented with aluminum foil and rested. In the meantime the pineapple and onion were roughly chopped and added to a food processor. To this was added cilantro, jalapeƱo (seeds and ribs removed, in place of Serrano), lime juice, oil, and some of the spice mixture. This was processed until it was roughly chopped and then served with the tenderloin. Total time was 65 minutes.


The pork was good though maybe a little overcooked as it was a little chewy. The rub did not provide as much flavor as expected, but this was compensated by the very good salsa which was the best part of the dish. Even though I over processed it, resulting in a muddy, juicy salsa, we liked it very much. The flavor was dominated by the pineapple which went very well with the pork.

Friday, August 20, 2021

Broiled Chicken with Gravy

 23 June 2021

Recipe from Cook's Illustrated, January 2021


The last few months we've tried several new chicken recipes: skillet roasted chicken breasts and oven-fried chicken. We enjoyed both of these. Then the January 2021 issue of Cook's Illustrated introduced yet  another recipe promising a quick route to roast chicken and it comes with a great bonus: gravy . (There are probably no Test Kitchen dishes with more recipes than roast chicken.) Any meal that includes gravy is going to get my attention so deciding to try this roast chicken recipe was an easy decision.


A whole chicken was spatchcocked: the backbone was removed, the chicken was placed breast up on a cutting board and pressed down flat. Holes were poked in the skin with a paring knife. The chicken was rubbed with vegetable oil, seasoned with salt and pepper, and the legs were tied together. Oil was heated in a skillet, the chicken was placed in the skillet, skin side up, and transferred to the oven. The broiler was tuned on and the chicken was cooked until the breast registered 155°. This took 55 minutes. The gravy wa prepared while the chicken cooked. 1 cup chicken broth was cooked with giblets, back, and trimmings from the chicken until all of the liquid evaporated and a dark fond formed in the saucepan. Onion, carrot, celery, fresh parsley, and fresh thyme, and garlic were added and cooked until the onion was translucent. Dry white wine was added, the fond was scraped off the pan bottom, and the mixture was  brought to a simmer.  Additional chicken stock was added and brought to a simmer and cooked until reduced in volume by half. The stock was strained into a bowl. Butter was melted in the saucepan and flour was added and cooked to a deep golden brown. The stock was whisked into the roux, brought to a simmer, and cooked until thickened. Drippings from the chicken were added to the gravy after removing fat. The gravy was not done until well after the chicken had been removed from the oven. Total time was about 2 hours.


The chicken and the gravy were both good and this recipe is worth making again. Mise en place for the gravy should be done before the chicken is placed into the oven so the gravy is ready sooner. Also, some of the chicken skin scorched. It still taste good but the worst of the scorching could have been prevented by protecting the skin with aluminum foil.


Tuesday, July 13, 2021

Baked eggs for sandwiches

 15 June 2021

Recipe from Cook's Illustrated, January 2021


This is one of the oddest, and simplest, recipes I've tried and written about. It's a method for making the main ingredient of an egg sandwich, the eggs, and a clever way to prepare them at that. I was intrigued when I read the article. I like sandwiches but I rarely eat egg sandwiches. In part because this recipe was so easy I gave it a try.


Eight eggs were whisked in a bowl with a little table salt. Then, ⅔ cup of water was added and whisked until combined. The egg mixture was poured into an 8x8-inch baking pan that had been sprayed with vegetable oil. This was placed on a rimmed baking sheet then 1½ cups of water were poured onto the baking sheet. The eggs were baked in a 300° oven until they were set, about 34 minutes. After cooling, the baking sheet was inverted to remove the baked eggs. The baked eggs were cut into pieces and used as part of sandwiches with ham, cheese, salad dressing, and tomato. Total time was about one hour.


These eggs were a nice addition to sandwiches and we had them several times for dinners and lunches through the week. The egg was smooth and custardy and did not have a strong eggy flavor. We were not very adventurous and had only ham and cheese rather than trying some of the other ingredients suggested in the magazine.  The eggs did not release cleanly from the baking pan but they released well enough that this was not a major issue. We tried freezing some of the egg but this did not work. After thawing, the eggs leaked copious amounts of water and had an odd texture. It was a nice change for dinner and good for warm summer days when no one wants to do a lot of cooking.

Monday, July 5, 2021

Cast Iron Baked Chicken

 25 May 2021

Recipe from Cook's Country, February 2018


This recipe is from the Cook's Country TV show from a few years ago. I must have liked what I saw as I made a note of it and have recently gotten around to making it. It is a relatively quick recipe that makes a fair amount of chicken without a large investment of time.


I broke down a whole 4-pound chicken though the recipe calls for bone-in chicken pieces. I'm comfortable breaking down a chicken and it is more convenient and less expensive than buying pieces. A cast iron skillet was placed in a cold oven which was then turned on and set to 450°. Paprika, salt, pepper, onion powder, and garlic powder were mixed. The chicken pieces were patted dry and seasoned with the spice mixture. When the oven reached 450° the hot skillet was removed. Butter was placed into the skillet and after it had melted fresh thyme sprigs were added. The chicken was added, skin side down, and returned to the oven for 15 minutes. The skillet was then removed and the chicken pieces flipped over. It was returned to the oven and baked for 15 minutes. At this point the chicken had exceeded the target temperatures of 160° for the breasts and 175° for the thighs and drumsticks. After cooling for 10 minutes the chicken was basted with the pan juices and served. 


This was good chicken and very easy and quick to prepare. The herbs provide a nice flavor. The skin was a little crispy and edible, though we are not fixated on producing crispy skin. The breasts were a little dry, I need to check the temperature a little earlier than I did. For the modest investment of time and effort this is certainly chicken worth having again. It provided four dinners for the two of us.

Friday, July 2, 2021

Corn Muffins

 25 May 2021

Recipe from The Cook's Illustrated Baking Book, America's Test Kitchen, 2013, p. 48; also available online


I have tried various recipes for corn bread: the northern version and the southern version and a hybrid version and my favorite, an Alton Brown version. However, searching back through the blog, I haven't tried corn muffins. A muffin would seem to be a convenient size as a dinner side dish or leftover for breakfast. Their smaller size, too, should cook faster and more evenly. All these are good things, but would they have a good texture and the right level of sweetness? I found a recipe in one of my cookbooks and subsequently found that it had been presented, with a few small changes, on the "America's Test Kitchen" TV show way back in 2004. 


This recipe used what Alton Brown referred to as the "muffin method", dry ingredients and wet ingredients are mixed separately then gently combined to form the final batter. All-purpose flour, stone-ground cornmeal (I used Bob's Red Mill medium grind cornmeal), baking powder, baking soda, and salt were whisked together. In a separate bowl, eggs were whisked, sugar was whisked into the eggs followed by melted butter. To this mixture, half of the sour cream was whisked in, then half of the milk, followed by the remainder of the sour cream and them the milk. The wet ingredients were added to the dry and mixed gently with a rubber spatula. The batter was portioned into mounds in 12 greased muffin cups and baked at 400°. Total time, excluding the short cooling time, was just 50 minutes.


These are good corn muffins, worth making again and a good alternative to corn bread. They have a good sweetness level. They are a little gritty, but not too gritty, a problem that could be solved by using a finer stone-ground, whole-grain corn meal. They are easy and quick to make, all of the mixing is done by hand with a whisk and spatula and they bake for less than 20 minutes. They cool quickly so can be eaten warm shortly after they come from the oven. They also keep well and are good to eat after a quick re-heating in the microwave. 


Wednesday, June 30, 2021

Detroit-Style Pizza

 18 May 2021

Recipe from Cook's Country, August 2017


There are many different styles of pizza so I guess it shouldn't have been a surprise when I learned of another from an episode of Cook's Country on TV. It's a pan pizza baked in a square pan as created at the Detroit restaurant Buddy's Rendezvous in 1946. Some changes had to be made to the original recipe so it could be made at home anywhere in the country. I won't be able to compare it to the original but I can try it to see if it is any good.


A 13x9-inch baking pan was sprayed with vegetable oil then olive oil was brushed on the bottom and sides. All-purpose flour, yeast, and sugar were whisked together in the bowl of a stand mixer. With the mixer running, room-temperature water (I always use bottled water for bread dough) was added and mixed until no dry flour remained. The dough was covered and let stand for about 10 minutes. Then, salt was added and the dough was kneaded in the mixer. It was turned out onto a counter and kneaded to form a ball of dough, adding bench flour as needed so the sticky dough could be handled. The dough was placed in the prepared baking pan and allowed to rest for about 15 minutes before being stretched to fill the pan. The dough rose until roughly triple in volume, about 2½ hours. Meanwhile, the sauce was created by mixing canned crushed tomatoes, olive oil, chopped fresh basil, minced garlic, dried oregano, dried basil, sugar, pepper, and salt. I couldn't find a small can of crushed tomatoes so used "petite-cut tomatoes" that I mashed and drained. When the dough was ready it was covered with grated Monterey Jack cheese then the sauce was applied in three stripes. The pizza was baked in a 500° oven for about 15 minutes, cooled for 5, then served. Total time, mostly hands off, was just under 3½ hours.


This is good pizza and worth having regularly. The crust is crispy and chewy and the sauce is flavorful and bright and there is just the right amount. We had two dinners and a lunch from this pizza. The amount of time invested to create it is reasonable since most of it is hands off. It is good left over, reheated in a covered skilled to crisp up the crust and melt the cheese.

Tuesday, June 29, 2021

Anzac Biscuits

 5 May 2021

Recipe from Cook's Illustrated, January 2021


These oatmeal cookies were developed around the time of World War I for the Australian and New Zealand Army Corps (ANZAC). They include one ingredient that is not common in American supermarkets and which I had to buy online: golden syrup. It was suggested that I substitute light corn syrup but I wanted to taste these with the genuine caramel flavor that the golden syrup provides. 


All-purpose flour was whisked together with sugar and salt. Rolled oats and sweetened flaked coconut were stirred into the flour mixture. Butter and the golden syrup, which has a consistency like honey at room temperature, were heated in a sauce pan until the mixture began to bubble. Off heat, a mixture of baking soda and hot water was stirred into the golden syrup mixture causing it to foam and bubble. The flour mixture was added and stirred to combine. (Making cookie dough in a sauce pan is a novel feature of this recipe.) The recipe specifies use of a #40 portioning scoop to create 24 balls of dough on two sheet pans. Not having a #40 scoop I used a #30 but didn't fill it all the way. Each ball was flattened into a 2-inch disk with a fork before baking the biscuits at 350°. Total time was 55 minutes, consistent with my 1-hour rule-of-thumb for the time needed to make a batch of cookies.


These are good cookies, errrr, biscuits. When fresh they have a crispy edge and a very chewy center with a rich caramel flavor which complements the coconut and oat pieces. Their orange-ish color is unlike any other biscuits that I have made. I plan to make these again, at least until I have used up my supply of Lyle's golden syrup. We'll see, then, if I decide to buy more golden syrup to make even more.

Sunday, June 27, 2021

Cream of Celery Soup

 13 April 2021

Recipe from Cook's Country, June 2013


Once a month we get small box of organic produce, a CSA (Consumer Supported Agriculture) box. Recently our box contained not one but two bunches of celery. What are the two of us going to do with all of that celery? I did some hunting and found a recipe for celery soup that would use close to half of it. This would be a good start on making good use of this bounty.


Twelve chopped celery ribs, sliced potato, chopped onions, sugar, dried sage, salt, and pepper were added to melted butter in a Dutch oven and cooked to soften the celery and onion. Flour was added and cooked for a minute followed by chicken broth and a bay leaf. The mixture was brought to a boil then simmered until the potatoes were tender. The bay leaf was removed and the soup was processed in a blender until smooth. It was returned to the the stove,  cream was added and brought to a simmer. After seasoning with salt and pepper it was ready to serve. The recipe's estimated time of one hour was not even close as it took me two hours to make. I spent close to half an hour just preparing the vegetables.


This is a good soup. It was creamy and smooth with a nice blend of flavors from celery, cream, and sage. Like tomato or split pea soup it is probably better as a side dish than as the main course of a dinner. Some of it was frozen which caused it to separate. It did not look appetizing in this state but after re-heating it was fine. I don't know if I'll make it again but it was certainly a good way to use excess celery.


Friday, June 25, 2021

Quick Chicken Cacciatore

 12 April 2021

Recipe from The America's Test Kitchen Quick Family Cookbook, America's Test Kitchen, 2012, p. 118.


It has been a while since we had chicken cacciatore. Searching through the blog didn't find much and since I didn't want a recipe that took a lot of time I checked the Quick Family Cookbook and found this recipe.


Quartered white mushrooms, chopped onion, olive oil, minced dried porcini mushrooms, and salt were cooked in a covered skillet over medium-high heat until the mushrooms had released most of their liquid. The cover was removed and cooking continued until the mushrooms were browned. Minced garlic and herbs de Provence were stirred in and cooked until fragrant. A little flour was stirred in and cooked for a minute followed with red wine and chicken broth which was whisked until smooth. Canned crushed tomatoes were added and simmered. Thin slices of boneless skinless chicken breast were added and simmered until the chicken was cooked and the sauce had thickened. It took a little over an hour to make the sauce which was then added to pasta to be served. We had it with both penne and farfalle. 


This was a good dish and worth having again. The chicken was tender and moist and the sauce was good with simple flavors. It would have been better if I had remembered to add the grated parmesan and chopped parsley just before serving. :-(  It was as good leftover as the first time, all that needed to be done was to cook some pasta, heat up some sauce, then toss them together. And add Parmesan and parsley ... don't forget that!

Tuesday, June 22, 2021

Sous Vide Turkey Confit

 17 April 2021

Recipe from Cook's Illustrated, November 2020


The title of an article in the November/December 2020 issue of Cook's Illustrated got my attention, "The Best Turkey You'll Ever Eat". I was tempted to make it except for the large quantity of expensive duck fat needed to confit the turkey. Confit is a cooking technique where meat is cured in salt then gently poached in fat, in this case duck fat. I was interested partly because I had never used this technique. Fortunately an alternative recipe was provided using sous vide cooking. It was still confit but instead of cooking the turkey in a Dutch oven filled with duck fat, it was cooked in sealed plastic bag immersed in a constant temperature bath with a much smaller amount of the expensive fat.


I halved the recipe, using one turkey leg (thigh and drumstick) instead of four thighs. Onions, thyme sprigs, salt, sugar, and pepper were finely chopped in a food processor. Some of this mixture was placed in the bottom of a baking dish, the turkey was placed on top, and the rest of the curing mixture was spread over the top of the turkey. The dish was wrapped in plastic wrap and placed in the refrigerator where it sat for four days. This step took 20 minutes to prepare.


The turkey drumstick and thigh were removed from the cure, rinsed well, and patted dry. Each was placed in a vacuum bag with duck fat, powdered garlic, and a bay leaf then vacuum sealed. These were lowered into a 158° water bath and cooked for about 20 hours. This step took 25 minutes to prepare.


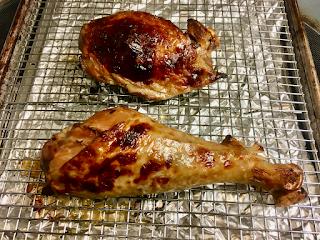
Aluminum foil was crumpled, then un-crumpled, placed in a sheet pan, and topped with a wire rack. The cooked turkey was gently removed from the water bath, transferred to the wire rack, then roasted in a 500° oven until browned. After resting for 15 minutes it was served with a sauce made with some de-fatted stock from the sous vide bags mixed with apricot marmalade (I had no orange marmalade), mustard, lime zest, lime juice, salt, and cayenne. This step took 40 minutes. While it took over five days to complete this recipe, the hands on time was under 90 minutes. 


After all that time the resulting turkey was good. We enjoyed the flavor, it was tender but not very juicy.  The sauce was okay but probably would have been better with orange marmalade. However, in the end it was just not the same as roast turkey with gravy that we are accustomed to having from Thanksgiving dinners. It was fun and easy to make and included several new cooking techniques, which is a good thing. However, I don't expect to use this method again. It was not the best turkey I've ever eaten. The trick with the crumpled foil to catch grease and prevent it from moving around, though, is a keeper and I have used it several times since learning of it from this recipe.