Saturday, March 31, 2018

Recipe Notes: Quick Beef and Barley Soup

27 February 2018

Recipe from All Time Best Soups, America's Test Kitchen, 2016, p. 18.


Once again I dove into the soup book that I got last Christmas for a new recipe to try. This time I chose a "quick" beef and barley soup. It looked to be easy to make, consistent with the "quick" in its title. Homemade soup is a great cold-weather entrée and I was hoping this one would be no exception.


I had a bag of pearl barley in the freezer. I wasn't sure if this was the same as "quick" barley, so I didn't look too hard for the latter in the supermarket. The recipe specifies sirloin steak tips for the beef component with a note that this is sometimes called "flap meat". I purchased 1.6 lbs of "flap meet" at Whole Foods; I hoped this was the right stuff. To start making the soup, carrots and onion were cooked in olive oil in a Dutch oven. Once the vegetables were softened, fresh thyme, dried porcini mushrooms, garlic, and tomato paste were added and cooked for 30 seconds. Beef broth, chicken broth, barley, and soy sauce were added and the mixture simmered until the barley was tender. According to the recipe this should have taken about 15 minutes, but for me this took about an hour and I had to add a cup of water due to the extra simmering time. Apparently pearl barley is not "quick-cooking"! In a skillet the beef, having been cut into ½-inch pieces and seasoned, was browned and then added to the Dutch oven once the barley was tender.  Even with the a slower-cooking barley, the soup was ready about two hours after preparations began. 


The result was a soup that we enjoyed as the main course for several meals. It had a nice beefy/umami flavor with a good consistency and tender, flavorful meat. For our first dinner with this soup we served it with sourdough crustini (fancy word for toast) and some red wine for a simple and satisfying dinner. This is a soup to make again, with quick barley or barley that takes a little longer to cook.

Recipe Notes: French-style Pork Chops with Apples and Calvados

25 February 2018

Recipe from America's Test Kitchen


Pork chops with apple sauce is a classic combination. America's Test Kitchen developed a more sophisticated version based on a French dish, pork à la Normande, designed for an American home kitchen. We hadn't had pork chops in some time, so I dug out this recipe to give it a try.


I used 4 boneless loin chops (27 ounces), rather than bone-in rib chops, due to availability. These were salted and refrigerated for an hour. While the chops rested the sauce was prepared. Bacon pieces were cooked in a sauce pot. Shallots, nutmeg, and salt were added and cooked until they began to brown. Calvados (apple brandy) was added and flambéd. Generating flames in our kitchen seemed safer in a sauce pot than doing it in a skillet and it was fun to do. Apple cider (Martinelli's Apple Juice in our case), chicken stock, fresh thyme, and chopped Golden Delicious apples were added and simmered until the apples were very tender. The pork chops were browned on both sides in oil and removed from the skillet. Apple slices were added to the hot pan and browned on one side then flipped over. The pork chops are placed on top of the apple and these were cooked in a 300°-oven to an internal temperature of 140°. While the chops were resting the sauce was strained and seasoned with vinegar, salt, and pepper. About two hours after beginning, dinner was served 


The pork chops tasted good with a nice crust, though they were a little chewy. The sauce was too thin, both in consistency--it didn't adhere well to the chops or noodles--and flavor, suggesting it should have spent more time reducing. The apples were cooked to a nice consistency, cooked through but still firm, and they went well with the sauce and pork. We had these chops as leftovers for three meals and they were better than when fresh. They were reheated in the sauce in a covered skillet with the apple slices. The re-heated sauce was thicker and more flavorful than when it was served originally. Given that this dinner only took two hours to prepare, and it created four dinners for the two of us, it is worth making again. Using rib chops could help with the tenderness of the pork and I know now to reduce the sauce more so it is thicker and more flavorful.

Friday, March 23, 2018

Recipe Notes: All-butter Pie Crust

19 February 2018

Recipe from Cook's Illustrated, January 2018


When making pie crust I generally use the Test Kitchen "Foolproof Pie Dough" from 2010 which includes vodka. The alcohol provides moisture, ensuring the dough is workable, but leaves the crust tender minimizing the development of gluten. I am not confident in my pie-making ability, probably due to lack of practice. I find it difficult to roll the dough into a nice circle, lay it evenly in a pie plate, create an attractive edge, etc. So when a new recipe was published in a recent Cook's Illustrated I wanted to give it a try to see if some more practice and a new dough would help boost my confidence.


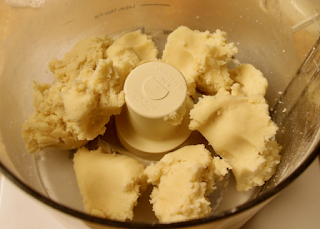
What sets this recipe apart is the method used to combine butter with the dry ingredients. Most of the flour is combined with sugar and salt. The flour mixture is blitzed in a food processor with most of the butter, which has been chilled and cubed, to form a smooth paste. The paste is broken into pieces, the remaining flour is added, and this is processed until the mixture forms small pieces. The remaining butter, which has been grated then frozen, is added to the mixture which is tossed to coat the grated butter with flour. Ice water is added and the mixture is mixed to moisten the ingredients. The dough is formed into a disk and refrigerated. Once chilled it is rolled out, baked, and filled with  chocolate pudding. Preparing the dough took 35 minutes. After chilling another 20 minutes was taken to roll out the dough including 10 minutes of room-temperature resting, followed by 40 minutes for baking.


I found this to be a very nice dough to work with. It was the easiest dough to roll out that I remember, there was no tearing of the dough and it did not stick at all to the rolling pin or counter top. However, after blind baking (using pie weights and aluminum foil) it shrunk considerably, slumping into the pie plate. It was flaky and tender, so good to eat. It was a great dough to work with and a great crust to eat so definitely worth trying again. My confidence has perhaps improved a little, but there is certainly room for it to grow with more practice.


Tuesday, March 20, 2018

Recipe Notes: Baked Orange-flavored Chicken

11 February 2018

Recipe from Cook's Illustrated, Mary 2006


You've probably had orange-flavored chicken. It is a staple at casual Chinese restaurants, places like those you find the food court in the mall. Crispy bits of chicken served in a pungent, orange-flavored sauce is popular, it has an undeniable appeal. So why not try it at home? Especially with a recipe that does not require deep frying.


Preparing the dish is straightforward. A sauce/marinade is made by combining chicken broth, orange juice, orange zest, strips of orange peel, distilled vinegar, soy sauce, dark brown sugar, garlic, grated fresh ginger, and cayenne pepper. Some of the liquid is used to marinade 1½-pounds of boneless, skinless chicken thighs cut into 1½-inch pieces. The rest is brought to a boil then thickened with a cornstarch slurry. The chicken pieces are coated with lightly beaten egg white followed with a flour/cornstarch mixture. These are then cooked on a rimmed baking sheet in ½-cup oil in a 500° oven, turning the chicken over half way though cooking. Making this dish took just under two hours.


The method for coating the chicken worked very well, the chicken was evenly coated and easy to handle. However, the chicken pieces cooked unevenly on the baking sheet, though all came out nicely crispy. The small amount of oil was not enough to evenly coat the baking sheet and it generated a lot of smoke, setting off the smoke alarm. The dish is okay but not great. The flavor of the sauce/marinade is dominated by the grated ginger which largely overpowers the flavor of the other ingredients. All in all this is probably not a dish I would make again.

Thursday, March 15, 2018

Recipe Notes: Anadama Bread

11 February 2018

Recipe from Bread Illustrated, America's Test Kitchen, 2016, p. 106; a similar recipe is available online.


It was only recently that I first  heard of Anadama bread. It originate in New England and is characterized by including both molasses and cornmeal as ingredients. As I continue trying different sandwich loaves I was eager to try this variation of a hearty loaf which promises to have more flavor and character than white bread. Not that I have anything against white bread.


This bread has a short ingredient list and is easy to make. The dry ingredients--flour, cornmeal, yeast, salt--are whisked together. The wet ingredients--water, molasses, melted butter--are whisked together separately. Using a stand mixer with dough hook, the wet ingredients are added to the dry and kneaded. I added an additional few tablespoons of flour to the dough as it was kneading so it would form a cohesive dough. The dough rises until doubled in size, is shaped and placed in a loaf pan, and rises again. The loaf is baked at 350° until done to an internal temperature of 205°. The total time is about 4 hours, most of which is hands off. 


This is a very good, hearty sandwich bread. It makes very good sandwiches and is also good toasted. It freezes well. Like most homemade breads, after a few days at room temperature it starts to get stale and tends to break apart more easily as you eat your sandwich. It doesn't have a strong molasses flavor or corn flavor that I notice. This is a bread to make again and again.


Tuesday, March 13, 2018

Recipe Notes: Chicken Piccata

4 February 2018

Recipe from Cook's Illustrated, January 2018


I believe that I have had chicken piccata before, probably in a restaurant where it is a safe dish to order when you aren't sure about the other choices. Chicken breasts are browned gently and served with a bright sauce with lemons and capers. It could make for a good, quick dinner.


The Cook's Illustrated web site includes a "for two" version of this recipe using just 2, rather than 4, chicken breasts. Each breast is cut into 3 pieces so we had this dish for 3 meals. I didn't note how long it took to prepare, but I would guess about an hour. The chicken is seasoned and set aside for 15 minutes. It is then dredged in flour and cooked in a skillet until golden brown on each side which takes only 5-6 minutes.  While the chicken rests the sauce is prepared in the same skillet. Shallot is cooked in oil until softened and garlic is added and cooked until fragrant. To this, chicken broth, lemon juice, and lemon slices (with the zest) are added and simmered. The chicken cutlets are placed in the sauce and simmered for 4 minutes. The chicken is moved to a serving platter and the sauce simmered for a few more minutes to thicken it. It is finished with butter, capers, and fresh parsley.


Unfortunately I have fallen behind with my blogging so it has been a month it chicken was too pale. Comparing it with the video on the Cook's Illustrated web site, though, suggests it was okay. If anything, I overcooked the chicken thinking it should be browner. Even with this flaw, we enjoyed chicken piccata for several meals. The sauce was bright with just the right amount of acidity and seasoning. This is a dish worth making again: quick and easy, just a handful of common ingredients, just don't go too crazy with the sides.

Monday, March 12, 2018

Recipe Notes: Split Pea and Ham Soup

28 January 2018

Recipe from All Time Best Soups, America's Test Kitchen, 2016, p. 163; also available online


This is another recipe from the new cookbook that I got for Christmas. Split pea and ham soup has long been one of my favorites. Traditionally to make this you need a leftover ham bone plus scraps of meat. However with just the two of us we never buy a large ham with a bone, so we never have leftovers for soup. Thus I was happy to find this recipe that takes a different approach not requiring a ham bone.


Two ingredients are used in place of the ham bone: ham steak and bacon. The soup is easy to make and is ready about two hours after preparations begin. Onion is cooked in butter in a Dutch oven followed by some garlic. Water (not stock or broth) is combined with the ham steak, dried split peas, bacon, fresh thyme, and bay leaves and cooked for about 45 minutes until the peas are just tender. At this point the ham steak is removed and set aside. Diced carrots and celery are added and cooked until tender, about 30 minutes. (I did this with the lid off in order to thicken the soup.) The bacon, thyme sprigs, and bay leaves are removed, shredded ham steaks are added back in (I cut the ham up instead of shredding it), the soup is seasoned (I added a little pepper), and served. 


We enjoyed this soup, both fresh and as a left over and will be making it again. It had a great consistency and flavor and was both easy and convenient to make. Two hours isn't a lot of time to invest for a soup and much of that time was hands off.