Saturday, November 29, 2014

Pasta, Greens, and Beans

November 16, 2014

Menu
Pasta, Greens, and Beans
Vella Chardonnay


Recipe
Pasta with Beans, Chard, and Rosemary from Cook's Illustrated, November 2014


I had never heard of greens and beans until I saw this recipe in the November/December 2014 issue of Cook's Illustrated. I thought it would be worth trying, a hearty, one-dish meal with pasta, beans, and greens. It reminds of simple, inexpensive food like red beans and rice. And I am found of beans in various guises and so was happy to try another.


Preparing the meal was easy and took about an hour. I was able to make good use of some of the leftover Parmesan cheese from last week's Sunday dinner. The recipe called for 10 ounces of Swiss chard and I was happy to find that a bundle of Swiss chard from the supermarket weighed just 10 ounces. I did not have the optional Parmesan rind to include with the other ingredients while they simmered. The fresh rosemary came from a container plant in our yard.


We both enjoyed this meal, I don't remember ever having anything like it before. It is like a hearty winter soup or stew, but not really like either of those especially with all of the pasta. Whatever it is, it is a satisfying meal for a cool day. It has a little heat from some red pepper flakes but not too much. With the cheese, greens, beans, and pasta it presents a nice combination of flavors and textures.


As we ate it on Sunday evening, we thought that it might be better as a leftover than fresh, improving over time like a stew or soup. However, this was not the case, as the leftovers seemed to have weaker flavors than the fresh dish, and it bordered on bland.


Thursday, November 27, 2014

Chicken Parmesan

November 9, 2014

 Menu
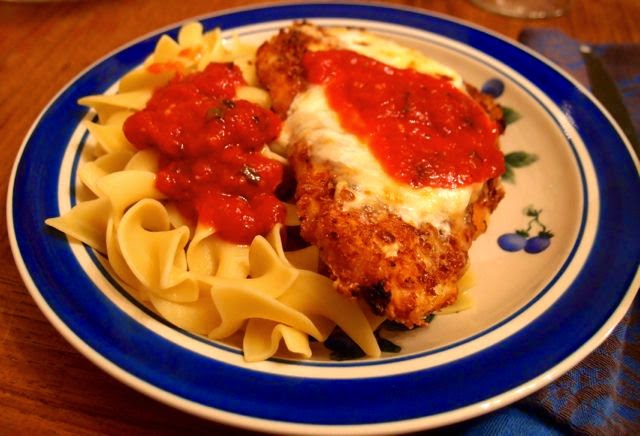
Chicken Parmesan
Noodles
Santa Cruz Mountain Vineyard 2012 Santa Lucia Highlands Pinot Noir


Recipes
Best Chicken Parmesan from Cook's Illustrated, March 2013


I have eaten chicken Parmesan in restaurants where I enjoyed the crispy coating and juicy  chicken, but I have never made it at home. Cook's Illustrated published a recipe in their magazine over a year ago and I finally got around to trying it out. I shouldn't have waited so long.

The meal took only 60-90 minutes to prepare. A simple tomato sauce is made with canned crushed tomatoes as the main ingredient. Making your own sauce this way is easy and produces a much fresher tasting sauce than you get buying a jarred sauce. The recipe made enough sauce for two meals of chicken parmesan plus another as a spaghetti topping


The most expensive ingredients were the three cheeses: mozzarella, fontina, and Parmesan. I bought blocks of all three rather than pre-shredded cheese, and grated them myself: the fontina and mozzarella on a box grater and the Parmesan with a microplane. The leftover cheese did not go to waste. Diane had the mozzarella and fontina in her lunch at work and the Parmesan has been used in several dinners.


We both enjoyed this meal and it is worth having again. It was a little salty but we were unable to identify the source of the salt. The sauce wasn't salty so maybe it was the cheese or the brine? As a leftover ,the chicken was just reheated in the microwave. It wasn't as good as the original as the coating was not as crisp, but it was still good.


Cook's Illustrated has some quicker recipes for chicken Parmesan (such as this streamlined thirty-minute version) that might be worth trying and it's usually worth looking at Food Wishes, too.


Saturday, October 11, 2014

Grilled Pork Tenderloin Roast

September 21, 2014

Menu
Grilled Pork Tenderloin with Hoisin Glaze
Grilled Potatoes
Grilled Sweet Corn
Bread and Butter Pickles
Lone Goat Vineyards Marlborough Pinot Noir 2009


Recipe
Grilled Pork Tenderloin with Hoisin Glaze from July, 2013, Cook's Illustrated


It has been a few weeks since we had this Sunday dinner so there are certainly details that I have forgotten. I didn't even take notes right after the meal, as I often do, so my recollections are even more vague. This could be a pretty short post.
Our favorite way to prepare pork tenderloin is to roast it with a maple syrup glaze. The July 2013 issue of Cook's Illustrated has a recipe for a grilled pork tenderloin that I have been wanting to try. Is it better than our favorite?  Several glaze recipes are included and I chose one based on hoisin sauce. One of my favorite dishes at a local Chinese restaurant is Mu Shu Pork which features hoisin sauce, so I am predisposed to like the combination of pork with hoisin.


The roast was created by tying two pork tenderloins together creating a more uniformly-shaped roast which would cook more evenly. The roast was soaked in a brine for an hour and cooked on the gas grill, initially on the cool side of a two-temperature grill, then seared on the hotter side with the glaze. The total grilling time was about 40 minutes. Additional hoisin glaze was served with the sliced pork at the table.


Except for the homemade bread and butter pickles, the side dishes were also grilled.  The last of our fresh, local sweet corn this summer was cooked using the technique that I recently discovered: the corn is oiled, cooked on the grill to char some of the kernels, then finished by steaming it in the microwave. I simplified this from the original, omitting the seasoned butter which didn't seem to add much flavor. Potatoes were grilled, also. White potatoes were cut into ¼-inch slices, coated with oil, seasoned with salt, and pepper, and grilled over direct heat. Simple and delicious.


A quick note on the wine. Our son, Caleb, and his girl friend, Karley, live in a cottage on a winery, Lone Goat Vineyards, near Christchurch, New Zealand. Caleb brought us a bottle of wine from that winery on a visit this previous summer, though the grapes were grown further north.


Do we have a new favorite method for cooking pork tenderloin? I don't think so. While this recipe produced moist, tender slices of pork accented by the hoisin glaze and sauce, it is not quite as good as the maple-glazed pork. However, this is a very good way to cook tenderloin on the grill. Putting two tenderloins together did ensure that the meat along the length of the roast was cooked evenly with no overdone or underdone regions.


Tuesday, October 7, 2014

Towards Better French Toast

October 5, 2014

Menu
French Toast
Fried Bacon
Mixed Berries
Mimosa


Recipe
Perfect Quick-and-Easy French Toast from Serious Eats


French Toast is one of the first things I learned to cook. I never used a recipe, following my father's example I would gently whisk some eggs, stir in some milk, maybe add some salt or sugar or cinnamon, soak some bread in it, and fry it on a griddle or in a skillet. The results were almost always good but, not surprisingly, inconsistent. What is the best way to make this favorite dish? What is the best ratio of egg to milk? What other seasonings should be added to the batter? What kind of bread should be used? How should it be cooked? There are a lot of variables for such a simple dish. It's time to start experimenting with some recipes!


The goal is an exterior that is crunchy with a velvety, custard-like interior. It should not be soft, wet, and soggy. It should not be too firm and eggy either. It should be easy to fix, not requiring a lot of extra time in the kitchen either preparing the ingredients or cooking.


I started my experimentation this Sunday with a recipe from Serious Eats. The recipe uses eight slices of ½-inch thick white bread. I wanted to use store-bought bread and bought a loaf of "Texas Toast" for its thickness. (Only afterwards did I measure the thickness of the slices and find it was ¾-inch.) The bread is dried in a 200° oven before being dipped in the batter. The main ingredients in the batter are 6 eggs and 2 cups of milk to make 8 slices of french toast. I cooked the toast in a cast iron skillet set over medium heat.


The finished French toast was good but it fell short of the goals. Some of the bread was too soggy in the middle while other slices were OK. None had as crispy an exterior as we would like. The recipe includes a pinch of nutmeg which Diane picked up on almost immediately: she does not like it and is very sensitive to its presence. I suspect the main problem leading to these results is the bread itself. It is a soft American bread and so it is perhaps not surprising that it leads to a soft French toast. It was also thicker than in the recipe so the interior was not properly cooked when the outside was done. I think this recipe might be worth another look some day but with different bread (and no nutmeg). In the meantime I have half a loaf of Texas Toast in the freezer and I can try it using another recipe.


For protein I decided to go with bacon over sausage. I like to have potatoes when we have breakfast for dinner but it seemed a little too much with a starchy dish already on the menu. After a little thought I decided to serve berries. I bought some blackberries and raspberries at the store; at this time of year these are not cheap so this was the most expensive item on the menu. I had them as a side dish while Diane used them as the topping on her French Toast along with whipped cream. I, of course, had maple syrup on my French toast.


Sunday, October 5, 2014

Mom's Bread and Butter Pickles


Recipe


My mom regularly canned food. There were three things that she always had on hand: strawberry jam, bread and butter pickles, and chile sauce. Whenever I  traveled to Central New York I would come home with a few jars of each to replenish my supplies. Since she died a few years ago I have had to find new sources for these favorites, or forgo them altogether.

The most popular by far was strawberry jam. Diane and I (mostly Diane, if truth be told) have been making strawberry jam now for several years. I think it is just as good as the jam that mom made. The sweet chile sauce is great with meat loaf. We have been able to get a reasonable version at the supermarket. The bread and butter pickles from the supermarket are good but they are not the same as those my mom made. I have been interested in trying to make these myself for several years. Fortunately we have her recipe but I never watched her make them and so I wasn't confident I could make them based on the instructions in the recipe alone.


 Two recent events changed this. First, a similar recipe was published on the Food Wishes blog which focuses more on teaching cooking methods than on recipes ... just the information that I felt I needed! Second, my sister Dena shared some notes that she made while watching my parents make these pickles. Late summer is the right time of year -- the store has the right kind of cucumbers -- I was confident that I knew what to do, and with Diane's help with the canning I was finally ready to give these a try.

I tried to learn more about the history of the recipe but without much success. I know that my mom's mother made these pickles before she did. Through my cousin, Carol, and her mom, my mother's older sister, Luella, I learned that the recipe is the same as the one my grandmother used but Luella didn't know where it came from.

Chef John suggested the recipe was developed during the Great Depression, when my mom was growing up, as a way to preserve extra cucumbers. Some Internet research bears this out though I didn't find anything definitive. There are several stories describing the origin of the name: it came from the simple sandwiches that would be made with the pickles, or they were considered a staple, like bread and butter, or it referred to the cash people would make selling the pickles.

My goal was to replicate the pickles that my mom made. I used the techniques demonstrated on the Food Wishes video and my mom's recipe augmented with Dena's notes. I made one intentional change to the recipe: 6 medium onions seemed like too many so I used just 3. I made one not-so-intentional change. I had too many cucumbers so I had to add more vinegar to cover the vegetables when cooking. I didn't add any additional sugar so the pickles are a little more sour than I remember. My mom sliced the cucumbers by hand but I used a mandolin and cut them 3/16-inch thick which seemed about right in the end. If I make these again I will probably try making them thicker and perhaps with a crinkle cut since that is easy to do with the mandolin.

I believe I succeeded, for the most part, in replicating my mom's pickles. The thickness and consistency seems right, the proportion of onions and peppers is right, and other than being a little more sour the flavor is also close to what I remember.


My parents were married for over 60 years and in those 60 years they worked together to can a lot of jam, chile sauce, and pickles. From Dena's notes:
After adding the mixture to cans, Mom sticks a butter knife in around the edges to "get the air bubbles out." Dad wipes the rim of the jar with a wet dishcloth and puts the lids on. After they're in jars with lids, Herbie put a dish towel on top to "keep them warm." Mom said it's best if they cool slowly and it keeps the draft from them.

I distinctly remember watching them do this together. It was like a dance.
I never watched this particular dance in person, but it is easy for me to imagine them working together in the kitchen of the home where we all grew up, part of the 60-year dance of their marriage. I am grateful that the dance goes on, not only in our memories but in the recipes we continue to use and the foods we continue to enjoy.


Tuesday, September 16, 2014

Kicked-up Grilled Cheese Sandwiches. Bam!

September 14, 2014

Menu
Grilled Cheese Sandwich with Cheddar and Shallot
Grilled Sweet Corn
Homemade French Fries
three twins Mint Confetti Ice Cream Cones


Recipes
Grown-Up Grilled Cheese Sandwiches with Cheddar and Shallot from Cook's Illustrated
Grilled Corn with Flavored Butter from Cook's Illustrated


In the early days of the Food Network it seemed like it was the Emeril network. Chef Emeril Lagasse seemed to be on the air whenever you tuned in. Emeril became well known for his catch phrases including "Bam!" and "kick it up a notch". (He tells an interesting story about the origin of Bam!). The dishes in this week's menu for Sunday dinner are not particularly special, but each, in its own way, is a kicked-up version of the standard preparation.

A grilled cheese sandwich is comfort food to many, but not to me.  I grew up disliking cheese. I'm still unlikely to pick up a piece of cheese and eat it, but I have grown to like cheese as a part of other dishes. I have made grilled cheese sandwiches for family members, but so far as I can remember I have never made one for myself.  Grilled PB&J or grilled ham and Swiss, certainly, but not grilled cheese. When I saw the America's Test Kitchen recipe for a "grown-up" grilled cheese sandwich I was sufficiently intrigued, despite my personal history with cheese. With another busy weekend requiring a meal that could be made without spending a lot of time in the kitchen, this recipe came to mind. Not only is it pretty easy but it would go well with the fresh local sweet corn that will soon be done for the season.


Grilled cheese sandwich: put a slice or two of cheese between slices of bread, butter the outside, and cook in a skillet until golden brown and the cheese has melted. This recipe is essentially that, but differs in several ways. The cheese is aged cheddar, not pre-sliced convenience cheese; the recipe recommended cheese that had been aged a year (but not more) but because of a memorable experience tasting sharp cheddar once, I chose a medium, 60-day, cheddar from Tillamook. Because aged cheddar is dry and doesn't melt well, it is combined in a food processor with brie and some white wine to form a cheese paste. Some minced shallots are added and this is spread between two slices of hearty white sandwich bread. A mixture of butter and Dijon mustard is spread on the outside and the sandwich is cooked slowly in a nonstick skillet. "Kicking it up!" While I should have cooked the sandwich longer so it would be even crispier, I enjoyed eating it. Judging from how fast the sandwich disappeared from Diane's plate, she liked it, too. I've been converted and might even try using a longer-aged cheese next time.


We are still enjoying fresh local sweet corn. Instead of just steaming it in the microwave, again, I used a Test Kitchen recipe which I adapted slightly. The corn was cleaned, sprayed with vegetable oil, and seasoned with salt and pepper. It was then grilled for about 10 minutes, turning as needed to cook all sides. The hot corn was placed in a glass dish with some butter that had been seasoned with chopped basil and parsley. "Bam!" This was then sealed with platstic wrap and cooked in the microwave for three minutes. While neither Diane nor I could taste the basil or parsley, we did enjoy the slightly chewier texture of the corn and the wonderful smoky flavor that was provided by grilling.


We could have had potato chips or frozen french fries. But no, I wanted to make my own from scratch. I used our mandoline (carefully, as always) to make ¼″ square fries from a single russet potato, with skins. These were rinsed to remove surface starch then stored in ice water until time to cook the potatoes. They were deep fried at 325°, removed from the oil, then cooked until brown at 350°. They could have been crisper but they were still very good and better than potato chips or frozen fries. "Oh yeah, babe."

For dessert we often have ice cream, but this ice cream was special. While visiting San Francisco a few months ago, we stopped at this little ice cream shop, "three twins ice cream", in the Lower Haight district and had the best bittersweet chocolate ice cream ever. A little research revealed that they sell their ice cream in supermarkets, too, and we found it was just as good. This week we tried a new flavor, a version of mint and chip called Mint Confetti, which is also excellent: rich, smooth, and creamy with just the right amount of fresh mint flavor accented with pieces of dark chocolate.


Wednesday, September 10, 2014

Frittata con Pasta

September 7, 2014

Menu
Frittata with Pasta
Garden Salad with Balsamic Vinaigrette
Mimosa


Recipe
Pasta Frittata with Sausage and Peppers, from Cook's Illustrated


Frittata is one of Diane's go-to dishes for weekday supper. It is a baked egg dish, similar to an omelet, to which you add a variety of other ingredients. It is ideal for using up what you have in your refrigerator. It can be prepared in the oven or in the microwave. It is relatively simple, quick, is good left over, and we like it. I once made a Spanish version of this, the tortilla, though I apparently didn't write about it. It is often served cold as tapas in restaurants; it includes a lot of olive oil and potatoes. I liked it but Diane did not enjoy the inclusion of potatoes.

The July/August issue of Cook's Illustrated magazine has a recipe for frittata which includes pasta. Since Diane doesn't like potatoes in frittata I wasn't sure how this would go over, but she was willing to give it a try. The dish originated in Naples as a way to use leftover pasta. This recipe does not rely on leftover pasta but it does rely on a 10-inch nonstick skillet. Our large nonstick skillets have lost their nonstick property and this was a concern for this recipe. The fritatta is prepared in the one pan, including cooking the pasta, which is really appreciated when it is time to clean up; breakfast for dinner usually creates a lot of dirty pans to clean.


In addition to eggs and pasta, this recipe includes sweet Italian sausage, peppers, garlic, Parmesan cheese, and parsley. I made a few minor modifications; I replaced jarred hot cherry peppers with a fresh gypsy pepper which I added to the pan when I browned the sausage. I did encounter some trouble with sticking, particularly for the angel hair pasta which is boiled in a water and oil mixture until all of the water is gone, and then cooked a little more to lightly brown the pasta. I was afraid I would be unable to get the half-cooked fritatta out of the pan so I could flip it over to finish the cooking. I did have some trouble but with a little help from a spatula I got most of it out in one big piece.


I followed the recommendation from the magazine article and served the frittata with a garden salad that included red leaf lettuce, cucumber, celery, parsley, and heirloom tomato dressed with balsamic vinaigrette. I had considered serving it with some toasted English muffin but the frittata had enough carbs in it already with the pasta.


While eggs and cooked pasta at first seemed a strange combination it worked quite well, bad pan and all. Diane seemed to be pleased with it as well. The recipe uses 8 eggs and says it makes 4 to 6 servings; we will get 8 from it. It was good as a leftover simply reheated in the microwave. I don't know that Diane will add it to her regular repertoire, we rarely have leftover, undressed pasta, but I may try it again after buying a new skillet.


Tuesday, September 2, 2014

Summer Winds Down, Still Eating Summer Food

August 31, 2014

Menu
Steamed Fresh, Local Yellow Corn
Polish Sausage
Homemade Potato Chips
Sutter Home Gewurztraminer, Sierra Nevada Pale Ale


Recipes
Extra Crunchy Potato Chips from Serious Eats


We are coming to the end of summer. School has been in session here for several weeks. The pumpkin sellers are setting up their retail patches. Gizdich Ranch has apples for the picking. However, the weather still says summer and there should be a lot of warm weather left before Fall gets here. I hope there are still many warm weather meals to be eaten before we start roasting and braising and diving into the soups from last Winter still waiting in the freezer.

This Sunday dinner menu started with sweet corn; while we still have it I want to eat it. Saturday was a busy day for us with a Giants game to attend so I wanted something pretty simple. I was originally thinking hot dogs; we had some buns to use up and I would prefer to eat them fresh than to freeze them for later. At the supermarket on Sunday morning, though, I kept my eyes open and purchased some Evergood brand Polish sausage to have instead of hot dogs. We used to get Polish sausage at Giants games in preference to hot dogs until the Giants changed their supplier a few years ago, but we still have Polish sausage regularly for dinner at home.


It wouldn't be a Sunday Dinner without trying something new. When we buy potato chips we always get plain kettle style potato chips, no barbecue vinegar sour cream jalapeño onion cheese flavored chips for us, thank you. I went searching for kettle style chip recipes and discovered they are really no different than regular chips, at least when you make them at home. I found an interesting recipe at Serious Eats and gave it a try. These chips are a little thicker than usual, ⅛″. After carefully slicing a russet potato on the mandolin, I rinsed the slices thoroughly to remove surface starch. Then, this recipe's trick: I boiled the slices for 3 minutes in water to which a little vinegar had been added. The vinegar did not flavor the potatoes but the lower pH helped keep the thin potato slices from falling apart during boiling. The par-cooked potato slices were deep fried until they stopped bubbling, removed from the oil, salted, and eaten. The goal of the recipe was to provide crunchy chips and it certainly did that, though I am still a little fuzzy on the discussion which differentiated between crispy and crunchy.


Everything about this meal was good and summery. The fresh corn, the fresh crispy crunchy chips, the sausage, and the weather. I expect we will be enjoying the warm weather and summer dinners for another month or so and continue eating outside. Darkness is starting to fall earlier, though, and it was pretty dark when our late dinner was finished, but all we need do is turn on some lights.


Leftovers
For the first time ever when I've made potato chips, we didn't eat them all with dinner. The leftovers were stored in a zipper top bag and finished off the next day. They were great, still crispy and crunchy with good potato flavor.


Saturday, August 30, 2014

I like to drink tree sap

August 24, 2014

Menu
Waffles with various toppings
Jimmy Dean Pork Sausage
Mimosa
Peach Pie


Recipes
Yeasted Waffles from The Cook's Illustrated Cookbook, 2011, p. 555
Fresh Peach Pie from The Cook's Illustrated Baking Book, 2013, p. 389


Going into the weekend, I didn't know what to cook for dinner on Sunday. On Saturday morning I was out for my regular morning walk, listening to podcasts. One of them mentioned waffles, reminding me I had experienced a vague craving for maple syrup not too long before. It has been a while since we had a Sunday dinner, or any other meal, that provided an opportunity to use the sweet sticky sap. I don't use commercial pancake syrups, only real maple syrup. Despite the price I like the real thing, sap taken from maple trees in the spring and boiled down. In addition to waffles, maple syrup is good on french toast and pancakes, but the most reliable of these is waffles as I have a recipe that I really like and they make for good leftovers. Diane came home from a church brunch with a bag of leftover blueberries, blackberries, and raspberries, great timing as I had been planning to buy berries to top the waffles for those (you know who you are) who don't share my love of maple tree juice.


As I have described before, these waffles are easy to make, easy to cook, and easy to store, they only require some advance preparation. On Saturday evening I prepared the batter and stored it in the refrigerator until time to cook on Sunday. By then the batter had expanded and was quite bubbly, as it should be. We had on hand both bacon and sausage and I chose the sausage as we have it less often than we do bacon. We had a box of the precooked Jimmy Dean original in the freezer and warming it on the stove top took all of 10 minutes. Our favorite beverage when having breakfast for dinner is mimosa. We recently discovered that you can buy little bottles of champagne in a four pack at the supermarket which is much more convenient than buying a big bottle which wouldn't keep well should we not use all of it.


For dessert I wanted to take advantage of the season and have a peach pie. The simplicity of the dinner preparations provided the time needed to make a pie. I had made a peach pie last summer and was disappointed in the result as the filling tasted more of ginger than of fresh peaches. I used a different recipe this time, one with no ginger, but again we were disappointed. I did something wrong making the dough and it was much too wet. Oops. After baking, the bottom crust of the pie was still doughy. Diane didn't like the filling because for her the taste was dominated by the pinch of nutmeg. I thought it was OK but it still didn't have the fresh peach taste that I love. I have decided that the only way to eat peaches in the summer time is to buy them fresh, tree ripened, and local (not the under ripe rocks the supermarket sells) and to just eat them out of hand.


Wednesday, August 20, 2014

Smoky Pulled Pork

August 17, 2014

Menu
Pulled Pork Sandwiches
Potato Salad
Steamed Local Sweet Corn
Beer, Wine


Recipe
Smoky Pulled Pork on a Gas Grill from Cook's Illustrated 


While touring culinary schools in New England with Caleb, I had my first pulled pork sandwich. We visited several institutions (Caleb would attend the Culinary Institute of America), among them the New England Culinary Institute (NECI). We ate lunch at their restaurant, NECI Commons, in Burlington, Vermont; like all of NECI's restaurants it is staffed by students. I had my first pulled pork sandwich and loved it. Almost every summer since I've smoked a pork shoulder on our gas grill so I could enjoy these sandwiches again. Some of my favorite food comes from long, slow cooking of tough cuts of meat, like pork shoulder and beef brisket. Fortunately the cooked meat freezes well as a five pound pork shoulder goes a long way.


The July/August 2014 issue of Cook's Illustrated magazine presents a new technique for making pulled pork specifically developed for a gas grill. It introduces several new tricks to help impart good smoky flavor to the meat to match or exceed what you get using a charcoal grill for smoking. These include increasing the surface area of the meat by cutting the roast into thirds, adding humidity by placing a pan of water in the grill, placing the meat on the grill while still cold, saving the smoky juices to use in the sauce, and careful construction of the wood chip packets containing.  The meat is seasoned overnight with a simple rub containing salt, pepper, brown sugar, and paprika. I used smoked paprika because that is what we had. Smoking and cooking the pork took a full afternoon to achieve the desired tender, smoky meat that makes these sandwiches great.


The side dishes were all easy to prepare. I visited a farm stand to get local, fresh sweet corn which has been very good this summer; it was steamed in our microwave, our usual preparation method. Diane made potato salad; I enjoyed eating it but can't say much about how it was prepared. We each had a different beverage. Diane had Vella Merlot, I had a nice beer from New Zealand--Tuatara Pilsner with its lizard-scaled bottle, and Caryn had Dead Guy Ale from Rogue Ales in Oregon. We served the pork on some store-bought rolls that have spent a little too much time in the freezer so we need to use them up sooner rather than later.


 Everyone enjoyed this meal. The pork was juicy, tender, and flavorful with a nicely seasoned bark providing some extra texture and flavor. The vinegar sauce did not adhere well to the meat and so it was not very prominent in the sandwiches. I'll try adding some additional at the table when we have these as leftovers. It was a simple, satisfying, summer supper.